How to Set Network Location to Private, Public, or Domain in Windows 10
A network location identifies the type of network that a PC is connected to with a network adapter.
By default, the first time you connect to a new network (wired or wireless), you will be prompted "Do you want to allow your PC to be discoverable by other PCs and devices on this network?" by the Network Location wizard. Turning on this setting prepares your PC for sharing files and devices on a network. Based on the network location you choose, Windows will automatically assign a network discovery state to the network and automatically sets the appropriate Windows Firewall and security settings for the type of network that you connected to. You can change the network location anytime.
Public network = By default, the public network location type is assigned to any new networks when they are first connected. A public network is considered to be shared with the world, with no protection between the local computer and any other computer. Therefore, the Windows Firewall rules associated with the public profile are the most restrictive. This blocks the following apps and services from working: PlayTo, file sharing, network discovery, and automatic setup of network printers, TVs, and other devices.
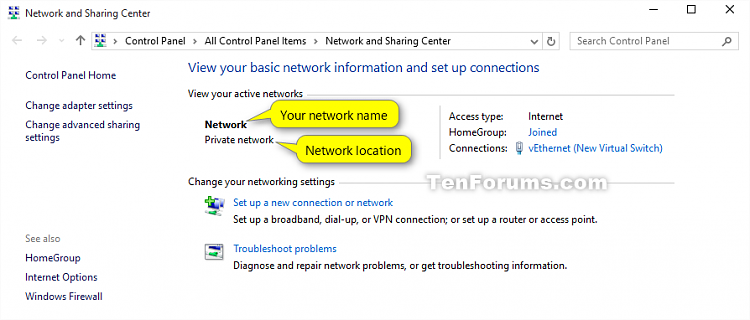
Private network = A private network location type can be for home or small office networks, or when you know and trust the people and devices on the network. This setting allows your PC to connect to a homegroup and devices on the network, such as printers.
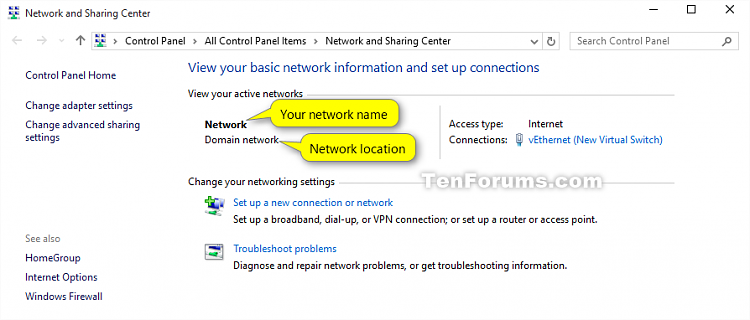
Domain network = The domain network location type is detected when the local computer is a member of an Active Directory domain, and the local computer can authenticate to a domain controller for that domain through one of its network connections.
This tutorial will show you how to set the network on your PC to be connected to a domain, public, or private type of location for all users in Windows 10.
You must be signed in as an administrator to be able to change the network location of a network adapter.
Contents
- Option One: To Change a Network Location in Settings
- Option Two: To Change a Network Location in Registry Editor
- Option Three: To Change a Network Location Local Security Policy
- Option Four: To Change a Network Location in PowerShell
- Option Five: To Change Network Location of Current Network Connection in PowerShell
- Option Six: To Change Network Location of Current Network Connection using a VBS file
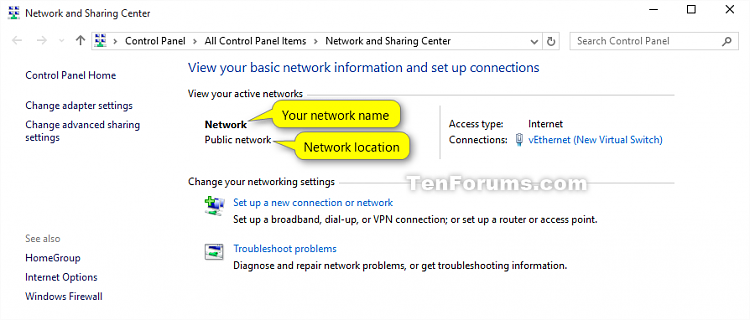
EXAMPLE: Network Location of adapter in "Network and Sharing Center"
1 Do step 2 or step 3 below for how you would like to open Network settings.
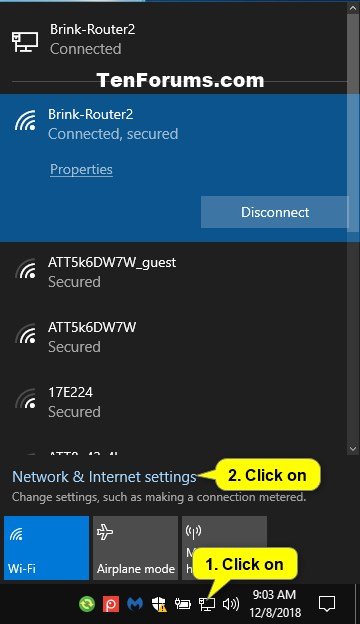
2 Click/tap on your network system icon in the taskbar notification area, click/tap on the Network & Internet settings link, and go to step 4 below. (see screenshot below)
3 Open Settings, click/tap on the Network & Internet icon, and go to step 4 below.
4 Do step 5 (Ethernet) or step 6 (Wi-Fi) below for you currently connected network.
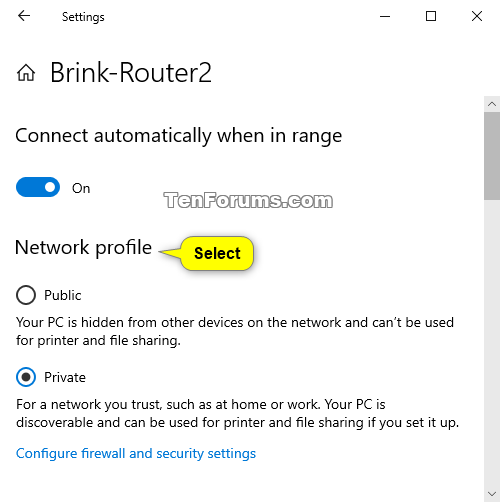
A) Click/tap on Ethernet on the left side, click/tap on the Ethernet connection (ex: Brink-Router2) on the right side you are currently connected to, and go to step 7 below. (see screenshot below)
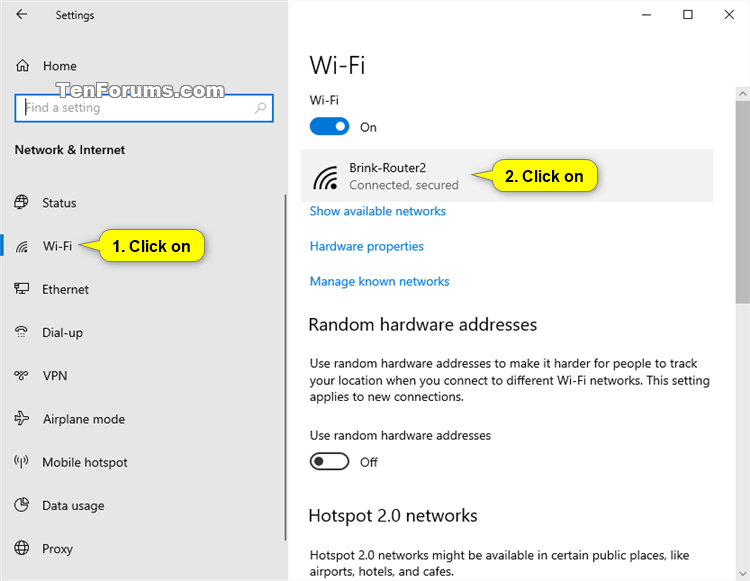
A) Click/tap on Wi-Fi on the left side, click/tap on the wireless network name (ex: Brink-Router2) you are currently connected to, and go to step 7 below. (see screenshot below)
7 Select (dot) Private or Public for the network location you want for this network connection. (see screenshots below)
These settings will not be available if your PC currently is set to have a Domain network location.
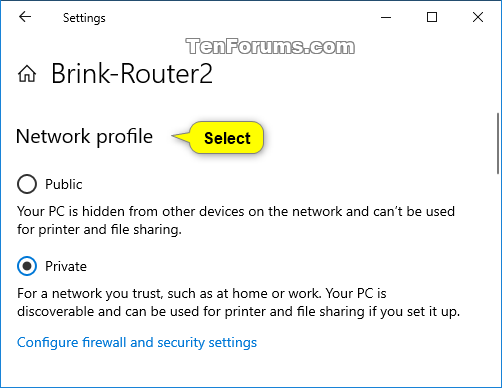
8 When finished, you can close Settings if you like.
1 Type regedit in the search box (Win+S) on Start or taskbar, and press Enter to open Registry Editor.
2 If prompted by UAC, click/tap on Yes.
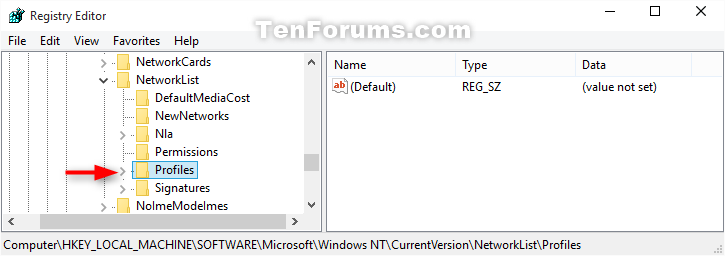
3 In Registry Editor, navigate to the location below. (see screenshot below)
HKEY_LOCAL_MACHINE\SOFTWARE\Microsoft\Windows NT\CurrentVersion\NetworkList\Profiles
4 Double click/tap on the Profiles key in the left pane to expand it. Click/tap on each long GUID number subkey, and look at its ProfileName string value in the right pane to see if it has the current network name (ex: Network) until found. (see screenshot below)
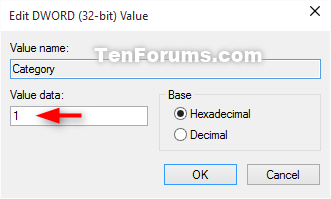
5 When you find the correct ProfileName for your network name, double click/tap on the Category DWORD value in the same right pane to modify it. (see screenshot below)
6 Type in a new data value number for the network location you want, and click/tap on OK. (see screenshot below)
Network Location Data Value Public 0 (zero) Private 1 Domain 2
7 When finished, you can now close Registry Editor if you like.
8 Sometimes you may need to sign out and in of your user account to apply the new network location.
This option will override Option One, Option Two, Option Four, Option Five, and Option Six.
1 Open the Local Security Policy (secpol.msc).
2 In the left pane, click/tap on Network List Manager Policies. (see screenshot below)
3 In the right pane of Network List Manager Policies, double click/tap on your network name (ex: Network). (see screenshot above)
You can click/tap on All Networks if you wanted to apply this to all networks on your PC instead of a single network.
4 Do step 5 (Not configured), step 6 (Private), or step 7 (Public) below for what you would like to do.
This is the default setting.
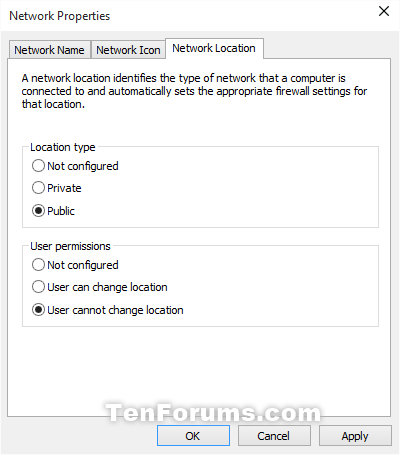
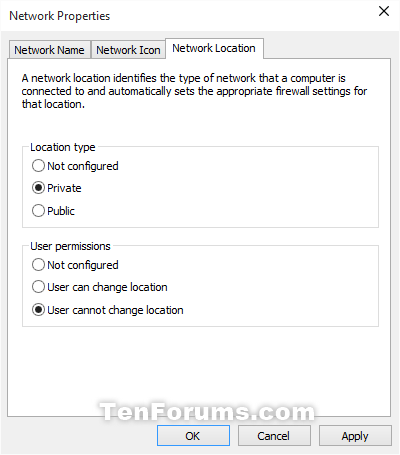
A) Click/tap on the Network Location tab. (see screenshot below)
The Network Location tab will not be available if your PC currently is set to have a Domain network location.
B) Under Location type, select (dot) Not configured.
C) Under User permissions, select (dot) Not configured.
D) Click/tap on OK, and go to step 8 below.
A) Click/tap on the Network Location tab. (see screenshot below)
The Network Location tab will not be available if your PC currently is set to have a Domain network location.
B) Under Location type, select (dot) Private.
C) Under User permissions, select (dot) User cannot change location.
D) Click/tap on OK, and go to step 8 below.
A) Click/tap on the Network Location tab. (see screenshot below)
The Network Location tab will not be available if your PC currently is set to have a Domain network location.
B) Under Location type, select (dot) Public.
C) Under User permissions, select (dot) User cannot change location.
D) Click/tap on OK, and go to step 8 below.
8 You can now close Local Security Policy if you like.
Thank you to our member sm156 for pointing out this option.
1 Open an elevated Windows PowerShell.
2 Do step 3 (see current location), step 4 (Private), step 5 (Public), step 6 (Domain) below for what you would like to do.
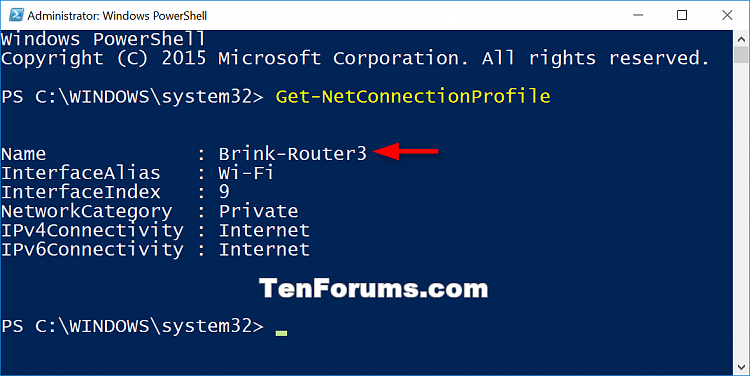
A) Copy and paste the command below into the elevated PowerShell, and press Enter. (see screenshot below)
B) Make note of the name of your network. For example: Brink-Router3
C) Go to step 4 (Private), step 5 (Public), or step 6 (Domain) below for what you would like to set your network location as.
A) Type the command below into the elevated PowerShell, press Enter, and go to step 7 below. (see screenshot below)
Set-NetConnectionProfile -Name "Brink-Router3" -NetworkCategory Private
Substitute Brink-Router3 in the command above with your network name from step 3 above instead.
A) Type the command below into the elevated PowerShell, press Enter, and go to step 7 below. (see screenshot below)
Set-NetConnectionProfile -Name "Brink-Router3" -NetworkCategory Public
Substitute Brink-Router3 in the command above with your network name from step 3 above instead.
This requires your PC to be joined to a domain.
A) Type the command below into the elevated PowerShell, press Enter, and go to step 7 below.
Set-NetConnectionProfile -Name "Brink-Router3" -NetworkCategory DomainAuthenticated
Substitute Brink-Router3 in the command above with your network name from step 3 above instead.
7 When finished, you can now close PowerShell if you like.
1 Open an elevated Windows PowerShell.
2 Do step 3 (Private), step 4 (Public), or step 5 (Domain) below for what you would like to set the network location of your current network connection.
A) Type the command below into the elevated PowerShell, press Enter, and go to step 6 below. (see screenshot below)
$net = get-netconnectionprofile;Set-NetConnectionProfile -Name $net.Name -NetworkCategory Private
A) Type the command below into the elevated PowerShell, press Enter, and go to step 6 below. (see screenshot below)
$net = get-netconnectionprofile;Set-NetConnectionProfile -Name $net.Name -NetworkCategory Public
This requires your PC to be joined to a domain.
A) Type the command below into the elevated PowerShell, press Enter, and go to step 6 below.
$net = get-netconnectionprofile;Set-NetConnectionProfile -Name $net.Name -NetworkCategory DomainAuthenticated
6 When finished, you can now close PowerShell if you like.
1 Do step 2 (Private), step 3 (Public), or step 4 (Domain) below for what you would like to set the network location of your current network connection.
A) Click/tap on the Download button below to download the file below, and go to step 5 below.
Set_Current_Network_Location_to_Private.vbs
Download
A) Click/tap on the Download button below to download the file below, and go to step 5 below.
Set_Current_Network_Location_to_Public.vbs
Download
This requires your PC to be joined to a domain.
A) Click/tap on the Download button below to download the file below, and go to step 5 below.
Set_Current_Network_Location_to_Domain.vbs
Download
5 Save the .vbs file to your desktop.
6 Run the .vbs file.
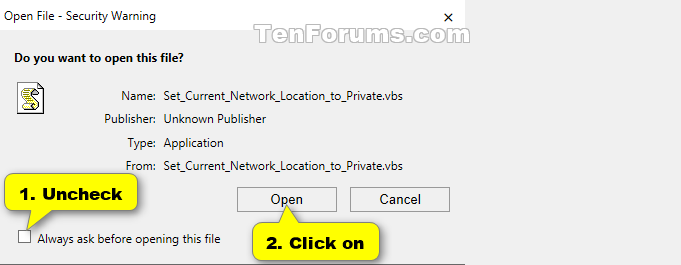
7 Unblock the .vbs file. (see screenshot below)
8 Click/tap on Yes or OK when prompted by UAC.
9 The network location of your current network connect will now be changed.
That's it,
Shawn Brink
Related Tutorials
- How to Add a Wireless Network Profile in Windows 10
- How to Enable or Disable Network Location Wizard in Windows 10
- How to Add or Remove Change Network Location Context Menu in Windows 10
- How to Turn On or Off Network Discovery in Windows 10
- How to Turn On or Off File and Printer Sharing in Windows 10
- How to Connect To a Wireless Network in Windows 10
- How to Turn On or Off Wi-Fi Sense in Windows 10
- How to Share Files and Folders Over a Network in Windows 10
- How to View All Network Shares on a Windows PC
Set Network Location to Private, Public, or Domain in Windows 10
-
New #1
Hi Brink great job I have one more way of changing the network location so if you ever get the time to add an option 4 here it is, Feel free to delete this post if you do.
Option 4 To Change Network Location in Settings in Powershell
open Powershell as an administrator
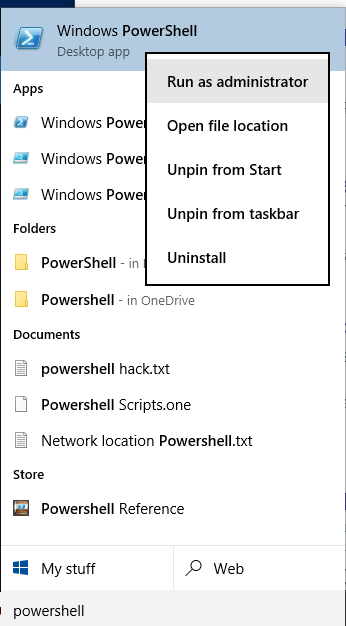
Enter this command
Code:Get-NetConnectionProfile
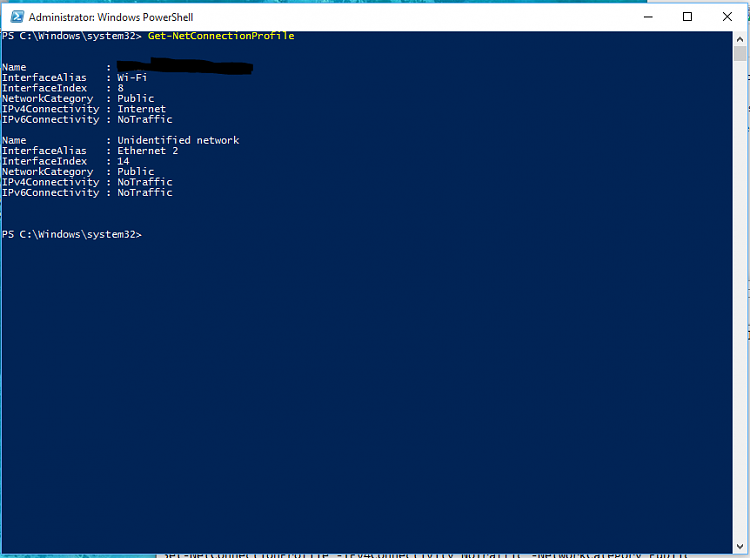
Find the interface you would like to change, In my case it is Ethernet-2.
Note: Originally my interface was called " Ethernet 2 " Powershell would not accept the following commands with a space so I renamed the interface to " Ethernet-2 " .
To change the interface type or copy paste the following command
Or to set it to PublicCode:Set-NetConnectionProfile -InterfaceAlias Ethernet-2 -NetworkCategory Private
Code:Set-NetConnectionProfile -InterfaceAlias Ethernet-2 -NetworkCategory Public
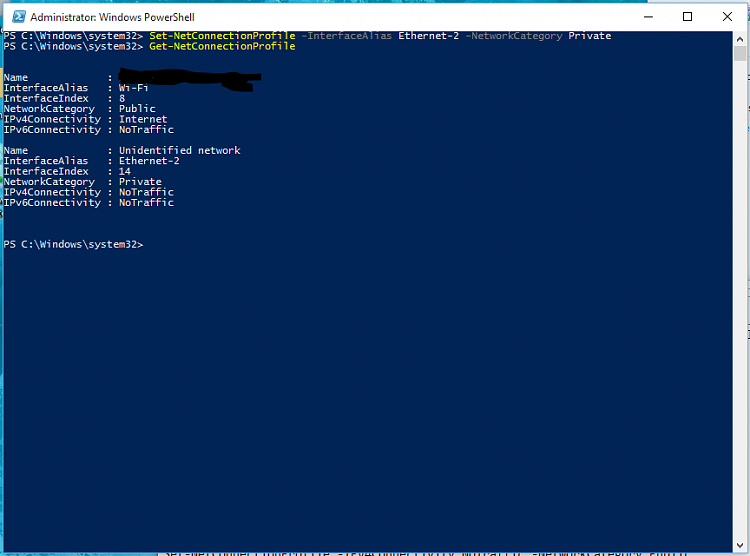
Note you can also change the interface by using other names
No matter what I do the changes are not persistent after a reboot no matter what method I have tried in your tutorial I think it has something to do with " Network location Awareness " I think I will have to make a automated task in task scheduler to make it persistant.Code:Name : XXXXX InterfaceAlias : Wi-Fi InterfaceIndex : 8 NetworkCategory : Public IPv4Connectivity : Internet IPv6Connectivity : NoTraffic Name : Unidentified InterfaceAlias : Ethernet 2 InterfaceIndex : 14 NetworkCategory : Public IPv4Connectivity : NoTraffic IPv6Connectivity : NoTraffic Set-NetConnectionProfile -InterfaceIndex 14 -NetworkCategory Private Set-NetConnectionProfile -IPv4Connectivity NoTraffic -NetworkCategory Private and so on.
Before and after picks of Network and sharing center
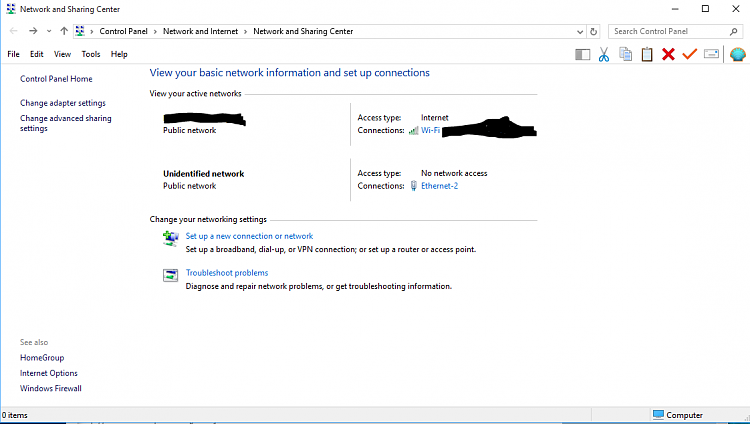
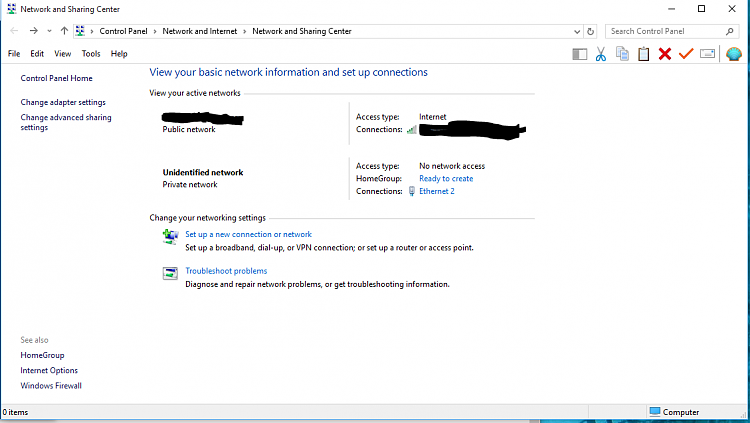
-
New #2
Thank you sml156. I added this as OPTION FOUR. :)
I'm not sure why your setting is not persistent. It's stays set for me after a restart.
Do you have network discovery turned on?
-
New #3
Thanks one thing about Option 4 in my case anyway was that PowerShell would return an error when my network card name had a space in it, Originally it was called "Ethernet 2" and the only way it would change state was to rename it "Ethernet-2"
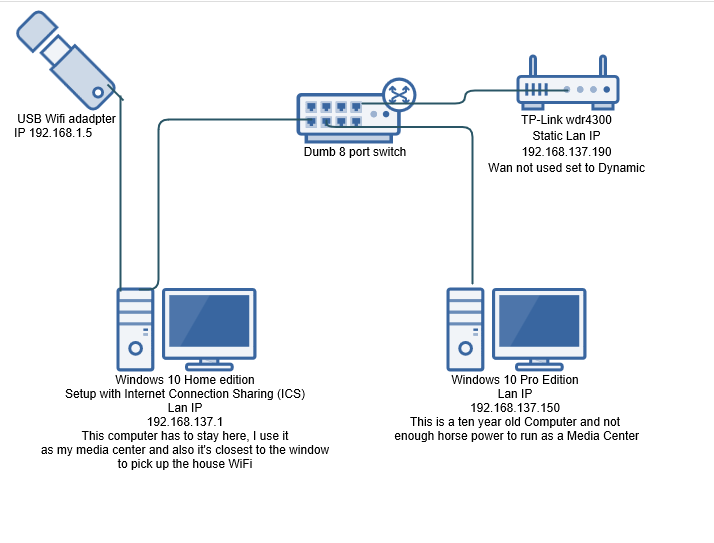
Something weird is going on with this Win 10 home edition I didn't notice until today that whenever I turn on Network discovery and press save then close Network sharing center and then reopen it my settings have changed back to turn off network sharing. I did want to try to figure it out but I'm tired of searching and the home edition does not have gpedit or secpol which is aggravating even when I don't have a problem and I do have a key for Windows ten Pro but I have been procrastinating and not installed it yet but I think I will do that this weekend.
I have an unusual setup for internet in my garage , I use a USB Wifi to get a signal from my house that is about 50 feet and two brick walls away. Right now the ports look like Hubbard's cupboards because I disconnected a couple of computers
This is what it looked like while I was trying to figure out the problem before giving up
-
New #4
 Hi Brink,
You were always a huge help on the Seven site.... so I am hoping you can be "Yoda" here too
I have a domain at home with desktops running W10 Enterprise. Clean installs. The Network location on each shows the domain (with the domain name). When the computers were set up, it took a couple of hours, but each machine was able to browse the network and see every other computer regardless of OS (7, 10, 2008r2 or 2012r2). The DC runs 2012r2.
This week I started upgrading to the, November, Threshold 2 update (build 10586). I used DVD's and just upgraded the OS on each machine, leaving all files in place (never did get the update offered through WU). Worked almost 100% perfectly (leaving each machine attached to the domain, etc.) However, on each machine that I updated, browsing the network is now limited to seeing ONLY the two W7 machines left on the LAN. I have tried the suggestions in this article, but my locations already show the domain, so I didn't need to change location.... There are no group policies...
Do you have any idea what the update might have changed or defaulted on these desktops? I am not sure how to get started fixing this. Whatever did change, probably was something that didn't work in previous builds or didn't exist, I guess. I also find it odd that they still see the W7 Pro X64 desktops.
Any advice would be appreciated.
Thanks.
Charlie
-
New #5
Hello Charlie, and welcome to Ten Forums. :)
I wish I could help, but I have no experience with domains for this. Please go ahead and create a new thread in the Network and Sharing forum area to see if someone may be able to help soon.
-
-
New #7
"Find devices and content" in #8 and #9 now reads "Make this PC discoverable" in Win10 TH2. MS just wants to keep you on your toes.
-
-
New #9
Hi, I can change it when I have Administrator rights. How about changing it by a user? Am I missing something? Build 10240

Set Network Location to Private, Public, or Domain in Windows 10
How to Set Network Location to Private, Public, or Domain in Windows 10Published by Shawn BrinkCategory: Network & Sharing
16 Aug 2021
Tutorial Categories


Related Discussions









 Quote
Quote