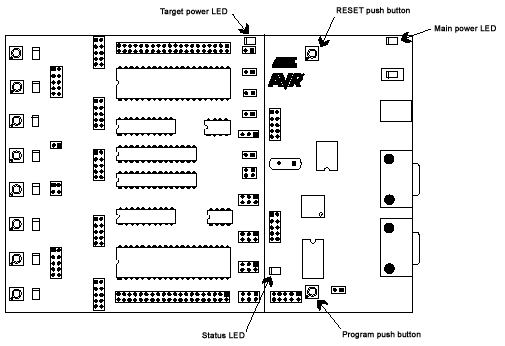

STK500 has two push buttons and three LEDS for special functions and status indication. The following section explains these features. The figure above shows the placement of these functions.
The RESET push button resets the target AVR device when pushed. The master MCU is not controlled by the RESET pushbutton. When the RESET jumper is not mounted the RESET push button is disabled.
Future versions of AVR Studio may upgrade the master MCU on STK500. AVR Studio will then detect old software versions of STK500 and update the Flash program memory of the master MCU. To do this the user is required to push the PROGRAM button when powering on STK500. AVR studio issues instructions on how to perform the upgrade during the upgrade process.
The red power LED is directly connected to the STK500 main power supply. The power LED is always lit when power is applied to STK500.
The target power LED is connected to Vcc lines (VTG) on the target AVR devices in the sockets. The target power LED is lit when power is applied to the target AVR device.
Status LED
The PROGRAM LED is a three-color LED. During programming the LED has yellow color. When the target AVR device is successfully programmed the LED will turn green If programming fails the LED will turn red to indicate that programming failed. When pro-gramming fails check the troubleshooting guide. During start up the status LED will shift from red, through yellow to green to indicate that the master MCU is ready.
See Also